Friday, January 26, 2018

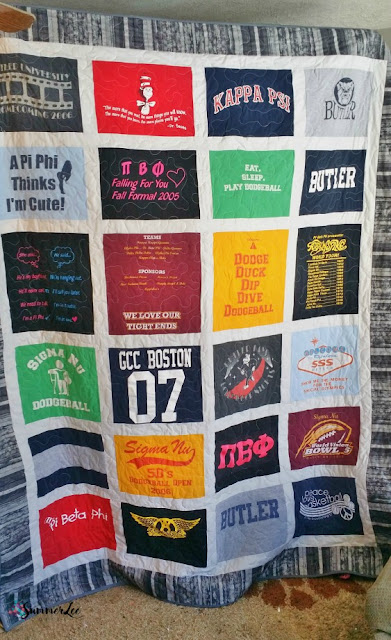
Butler T-shirt Quilt - Finished

Hi there!  I have a finished t-shirt quilt to share with you all today.  I really do love t-shirt quilts, because of how they celebrate a past and carry so many memories.  <3

I shared the story and process of this particular quilt on this post.


I went back and forth about the border (with the help of those of you who sent me messages), and I finally decided on the gray because I thought the ombre effect would be especially striking with the gray sashing.  Thank you all who helped me pick. <3


I did something different with the quilting on this one, than I have in the past.  I quilted through the designs, instead of around them, which the exception of a couple that had designs that were particularly thick.  I was afraid that my machine might skip and leave holes in those.  But I'm pleased with the overall quilting effect, and it was easier to quilt over the designs than I thought.

Thanks so much for stopping by today!


I'm linking up today with Finish it up Friday!

Friday, January 19, 2018

Crossing Paths Finished Quilt Top

Hi there!  I'm so glad it's Friday, and I get to share a finish with you!  

I've been holding onto this Rolie Polie of High Adventure by Design by Dani for Riley Blake for over a year, waiting for the perfect pattern or inspiration to come across my path.  Well, Missouri Star did it!  I saw the Crossing Paths tutorial and fell in love.

It's been years since I've done strip piecing, but the blocks were so easy to make.


Here they are laid out on my sewing room floor.


Now, up to this point, the quilt was smooth sailing.  However, once the rows were sewn together...I started running into to trouble.  I inadvertently turn blocks around.  I sewed rows together on the wrong side.  At one point, in one row, I had the two center blocks rotated the wrong way but the rest of the row was right.  I haven't used a seam ripper so much on a project in a long time!

I didn't give up on it and finally...this happened!

 
I considered putting a navy border on it with little 4-path corners, but I really like the edge to edge design on this one.  I think I'll save the navy for the binding instead.  

I haven't decided how I'll quilt it yet.  I really don't like doing straight-line quilting, but I think maybe diagonals would be pretty.  We'll see. :)

Thanks so much for stopping by today!  Have a great one!


I'm linking up with all the Friday finishes at Finish it up Friday, Finished or Not Friday, TGIFF, and Can I get a Whoop Whoop?!

Saturday, January 13, 2018

Introducing...Scrappy Star Placemats!

Hello!!  I am so excited this morning to finally be able to share this!

I've been dreaming about offering patterns for years, but I just never did it for lots of silly reasons.  Well, this year, I've made it a goal to stop listening to those silly excuses and reasons, and to just do what my heart wants to do!

So...this morning, I get to formally introduce you to Scrappy Star Placemats!


These placemats are so super fun, using simple techniques, with a stunning result.  They are charm pack friendly.  One charm pack with 36+ squares will give you 4 placemats.


As a homeschooling mama, I know that everyone learns in different ways.  So, I wrote detailed descriptions on how to make these, but I also included lots of full color pictures for the detailed learners.


Materials Needed:
36 - 5” squares of coordinating prints (or ¾ yard total)
1 ¾ yard solid fabric for top, backing, and binding
4 – 13.5” x 17.5” rectangles of batting

You can find it now here: Scrappy Stars Placemats


Monday, January 8, 2018

Butler T-Shirt Quilt - Work in Progress

Hello there!  I hope you had a fantastic weekend.  We're having very cold weather here in Indiana, so we've been trying to stay in as much as possible...and the kids are definitely feeling the cabin fever!  We actually pulled out an old ab roller for the 4-year old to use to get out her energy.  It's pretty funny to see her pushing it around the house, running behind it.  But, hey!  Whatever works!

With all the inside work going on, I've found some consistent time in my sewing room, which is good, because I think I have approximately 214 projects I want to make.  That might be a bit of an exaggeration...but only a bit. ;)

My biggest project going on right now is this commissioned T-shirt quilt.  It has a sweet, sweet story behind it.  Husband and wife attended college together (maybe met there, but I don't remember).  She sent me their college shirts, including their fraternity and sorority shirts, to put together into one beautiful piece that will be a surprise for him on Valentine's Day!  I told you it was sweet.

As usual, I started this one off by measuring each individual design, giving a 1/2 inch on each side for buffer, and the width of the shirt.  Then I play around on graph paper (with a pencil and a GOOD eraser), until I find a consistent height and width that will be appealing and will equal the size quilt my customer would like.  This part can take a while to do...sometimes over a couple days, but I really do love this part of it.  The math is so satisfying.


After I took this picture, I wrote in the unfinished dimension of each piece on my graphed design.  That way I have a very easy to see guide, and then I check off each piece as I cut it.  I'm not sure if it's overkill or not, but it certainly helps keep me organized.

Next up, I carefully cut one row at a time, attach the sashing to each of those blocks, and complete that row, before I start cutting the next row.  This keeps me from mixing the shirts up if something calls me away or a child decides to run through the room.


Here are all of the completed rows.


They are currently on my ironing board with the long sashing strip on each row, waiting for me to press them open.

I'll put a sashing border around it, then a 6" border on the outside. These are the 2 fabrics my customer liked for the border, and she told me to choose.  I haven't yet.  What do you think?


I like the gray stripes, because it matches the gray sashing.  However, that navy and white is gorgeous AND is in Butler colors.  Oh, decisions, decisions.

Well, hopefully, I'll have it done for the Friday finishes.

I hope you have a great day and stay warm!

~Summer


I'm linking up today with Monday Making and Em's Scrapbag!

Friday, January 5, 2018

Coral Bells Runner from Scraps

Hi there!  I'm excited to share a finish with you this week.  This was a fun one for me, because it wasn't pre-planned.  See, I made a custom table runner back in October (you can see it here), but I unexpectedly ended up with a bunch of leftover half-square triangles.

Well, the first was so pretty that I couldn't just leave those little blocks unloved, right?

So here's what I made!


There are SO many option for design with half-square triangles, but I really want to come up with something I hadn't done before...and I really like it!


I did have to be extra careful to keep them all turned the right way...laying the blocks out was a little tricky.


I chose to do the same paisley quilting pattern I did on the last one.  I really enjoy doing this pattern.  It's highly therapeutic.


I was pleased to still have enough of the binding leftover for this runner too!  There's something great about a good plaid binding.


The finished size was 12.5" x 48".

Thanks so much for stopping by today!

~Summer


I've linked up today with Finish it up FridayCan I get a Whoop Whoop?, Finished or Not Friday, Off the Wall Friday, and TGIFF!